Overview
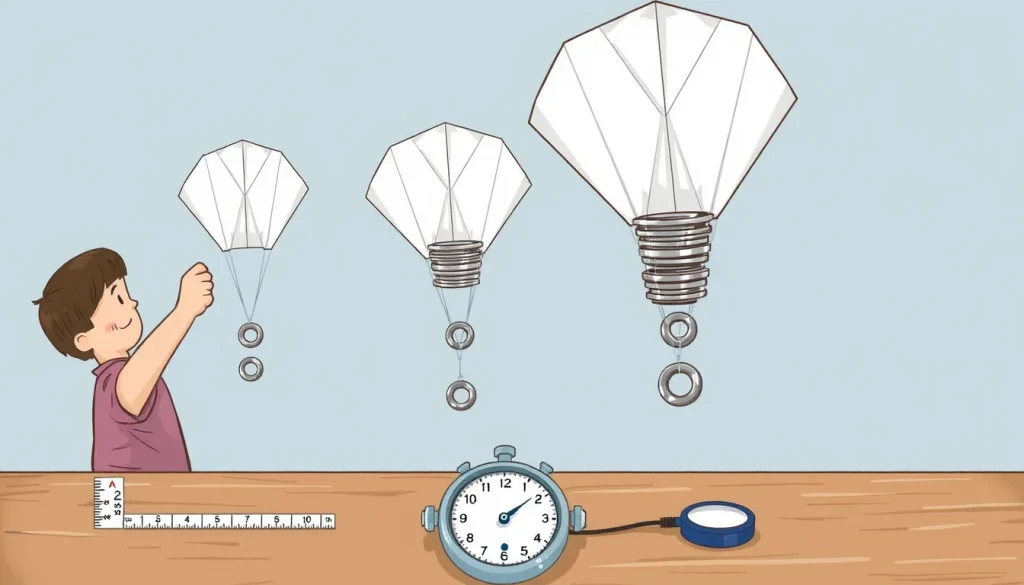
This experiment lets children see physics in action with everyday materials. By building paper parachutes of several different canopy sizes and attaching the same weight to each, they can measure how quickly the parachute falls. The results reveal how a larger surface area creates more air resistance, allowing the parachute to support heavier loads or to descend more slowly. The activity is safe, inexpensive, and fits well into a home, classroom, or homeschool setting.
Before you begin
- Space: Choose an indoor area with a high, clear drop zone (e.g., a stairwell, a balcony, or a tall doorway). A minimum drop height of 2 m (about 6 ft) gives measurable times while keeping the parachute within reach.
- Adult supervision: Younger children (under 10) need help with scissors, measuring, and timing.
- Weather: Perform the test indoors to avoid wind or drafts that could skew the data.
Materials
- Plain printer paper or lightweight copier paper (A4 or Letter size). 5–6 sheets total.
- Lightweight string or yarn, 30 cm (12 in) long per parachute.
- Clear adhesive tape or a stapler.
- Scissors.
- Small identical weights – for example, a set of metal washers, coins, or LEGO bricks (each 5–10 g). Aim for 3–5 pieces that can be added together.
- Stopwatch or a smartphone timer.
- Ruler or measuring tape.
- Marker for labeling.
Testable question
How does the size of a paper parachute canopy affect the time it takes to fall a fixed distance when the same weight is attached?
Hypothesis
Because a larger parachute catches more air, it creates greater drag. Therefore, a parachute with a bigger canopy should take longer to reach the ground, allowing it to safely lower the same weight more slowly than a smaller canopy.
Variables and controls
| Variable | What it is |
|---|---|
| Independent variable | Canopy area (size of the paper square or circle) |
| Dependent variable | Fall time measured from release to ground (seconds) |
| Controlled variables |
|
Procedure (Steps)
- Plan canopy sizes. Cut three squares of paper: small (10 cm × 10 cm), medium (15 cm × 15 cm), and large (20 cm × 20 cm). You may also try circles of the same areas; keep the shape consistent across sizes.
- Attach the suspension lines. Cut four equal lengths of string (≈30 cm). Tape or staple each string to the corners of the square (or equally spaced around the circle). Gather the free ends and tie them together in a knot, leaving a short loop for the load.
- Add the weight. Clip the same number of washers (e.g., three 5 g washers = 15 g total) to the loop. Use a paper clip or a small piece of tape so the weight does not shift during the drop.
- Label each parachute. Write the canopy size on the back of the paper to avoid confusion when recording data.
- Measure the drop height. From the release point (e.g., the edge of a table) to the floor, measure the vertical distance and record it (e.g., 2.0 m). Use this same point for every trial.
- Conduct a trial. Hold the parachute by the knot, raise it to the release height, and let go without pushing. Start the stopwatch the moment you release and stop it when the weight touches the ground.
- Record the time. Write the result in the data table (see below) next to the corresponding canopy size.
- Repeat. Perform at least three trials for each canopy size, re‑tying the knot and checking that the weight is still attached correctly each time.
- Analyze. Calculate the average fall time for each size and compare.
What to observe and measure
- Fall time (seconds): measured with the stopwatch.
- Stability of descent: note whether the parachute wobbles, spins, or stays steady.
- Any damage: after each drop, inspect the paper for tears; a torn canopy will affect drag.
Repeated trials
Repeating each canopy size three times reduces random error caused by slight variations in release technique or air currents. If the times vary widely (more than ~0.5 s), consider doing additional trials or practicing a smoother release.
Data table (blank)
| Canopy size (cm²) | Trial 1 (s) | Trial 2 (s) | Trial 3 (s) | Average (s) |
|---|---|---|---|---|
| Small (100) | ||||
| Medium (225) | ||||
| Large (400) |
Graphing your results
Plot the average fall time (y‑axis, seconds) against canopy area (x‑axis, cm²). Each point represents one size. A rising curve will show that larger areas produce longer fall times, confirming the hypothesis. If you wish to explore weight limits, repeat the whole set with heavier loads and add a second series to the same graph.
The science explained
When a parachute falls, two main forces act on it:
- Gravity: pulls the weight straight down with a force equal to mass × 9.8 m/s².
- Air resistance (drag): pushes upward as the parachute moves through the air. Drag is roughly proportional to the area of the canopy and the square of the speed ( D = ½ C_d ρ A v² ), where C_d is a shape‑dependent drag coefficient, ρ is air density, A is the projected area, and v is velocity.
As the parachute accelerates, drag grows until it equals the weight’s gravitational force. At that point the system reaches terminal velocity and falls at a constant speed. A larger A means a larger drag force at any given speed, so the parachute reaches a lower terminal velocity – it falls more slowly. Because the descent is slower, the same parachute can safely carry a heavier load without exceeding a speed that would tear the paper. This principle is why skydivers use very large canopies for heavy payloads and smaller “ram‑air” designs for speed‑focused jumps [4].
In our experiment the drop height is short, so the parachute may not reach full terminal velocity. Still, a larger canopy provides more early‑stage drag, which lengthens the measured fall time and demonstrates the same relationship.
Troubleshooting
- Parachute spins or dives: Check that the four strings are equal in length and attached symmetrically. Unequal tension creates torque.
- Paper tears: Use a fresh sheet for each trial or reinforce the edges with a thin strip of tape.
- Inconsistent release height: Mark the release point on a table edge or use a small step stool to keep the starting position identical.
- Timer error: Practice starting and stopping the stopwatch simultaneously with the release. If possible, use a video recording and count frames.
Next steps
Once the basic relationship is clear, children can extend the investigation:
- Try different shapes (circle, triangle, hexagon) while keeping area constant.
- Use heavier or lighter paper (cardstock vs. tissue) to see how material stiffness influences drag.
- Vary the load weight while keeping the canopy size fixed to discover the maximum safe payload.
- Measure the actual terminal velocity by increasing the drop height (e.g., from a balcony) and plotting speed versus time.
Each extension deepens understanding of air resistance, engineering design, and data analysis—key skills for science fairs and everyday problem solving.
Related terms
- Drag
- The force that air exerts opposite to an object's motion; it increases with the object's speed and the area that pushes against the air.
- Terminal velocity
- The constant speed an object reaches when the upward drag force equals the downward force of gravity.
- Air resistance
- A type of friction that slows moving objects as they push through the air.