Overview
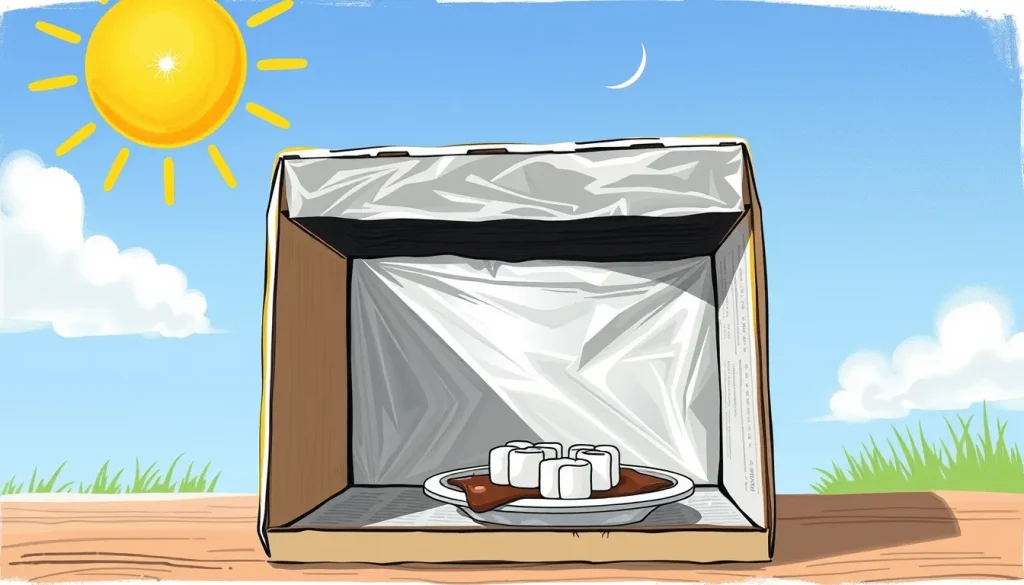
This project turns a common pizza delivery box into a solar oven capable of reaching temperatures high enough to melt chocolate, melt marshmallows, or warm a slice of pizza. It is an engineering challenge: you must meet a performance goal using only everyday recyclable materials, while keeping the construction safe and simple for children ages 6‑14.
Before you begin
- Choose a sunny day or a location that receives direct sunlight for at least 30 minutes.
- Gather an adult to help with scissors, utility knives, and hot glue if you choose to use it.
- Set up a flat, stable work surface outdoors or near a window. Have a thermometer (digital or analog) handy for temperature measurements.
- Plan for a short cleanup: the materials are recyclable, and any leftover food can be composted or discarded.
Materials
| Item | Quantity / Size |
|---|---|
| Pizza box (or any lidded cardboard box at least 12 × 8 in.) | 1 |
| Aluminum foil | 1 sheet (large enough to line flap) |
| Black construction paper or black duct tape | 1 sheet or roll |
| Clear plastic wrap (shrink‑film or cling‑film) | 1 sheet, enough to cover the box opening |
| Newspaper (crumpled) | ~3‑4 sheets for insulation |
| Scissors or utility knife | 1 |
| Tape (packing tape or transparent tape) | 1 roll |
| Wooden skewers or a thin stick | 1 (to prop the flap open) |
| Food to test – e.g., s'more ingredients (marshmallows, chocolate, graham crackers) | as needed |
All items are inexpensive and can be found at home or in a typical classroom supply cabinet. The only optional tool is a hot glue gun, which can make the foil and plastic wrap adhere more securely, but regular tape works just as well.
Design constraints and success criteria
Because this is an engineering challenge, you must decide what “success” looks like before you start building. Use the following criteria as a checklist:
- Temperature goal: Reach at least 80 °C (176 °F) inside the oven, which is enough to melt chocolate and soften marshmallows. This temperature can be verified with a thermometer placed on the food.
- Time limit: Achieve the temperature within 30 minutes of direct sun exposure.
- Material limitation: Use only the items listed above (no metal pans, no external heating sources).
- Portability: The finished oven should be lightweight enough for one child to carry.
- Safety: No part of the oven should become hot enough to burn skin on contact; handle only by the cardboard box or the wooden skewer.
Record whether each criterion is met after testing. If a goal is not reached, you will iterate on the design (e.g., add more foil, adjust the angle, improve insulation).

Step‑by‑step construction
- Prepare the box: Open the pizza box and set it on its side so the lid becomes the top. Using a ruler, draw a 1‑inch border around three edges of the lid, leaving the side attached to the box untouched. Cut along the inner lines to create a flap that can be lifted up.
(See the DOE guide for the exact flap dimensions) [1] - Line the interior: Tape the black construction paper or a strip of black duct tape to the bottom of the box. This black surface absorbs sunlight and converts it to heat.
- Make the reflective flap: Cover the inner side of the flap (the side that will face the sun) with aluminum foil, shiny side out. Smooth the foil with tape so it stays flat and does not tear.
- Insulate the sides: Crumple the newspaper sheets and tape them around the interior walls of the box, leaving the top opening free. The air pockets in the crumpled paper act as insulation, reducing heat loss.
- Create the transparent window: Stretch a piece of clear plastic wrap over the opening of the box (the area where the flap lifts). Secure the plastic with tape, making sure it is airtight. The plastic trap solar radiation inside, creating a greenhouse effect.
- Position the flap: Prop the foil‑covered flap open at an angle of about 30°–45° toward the sun using the wooden skewer or a folded piece of cardboard. The angle can be adjusted during testing to maximize reflected sunlight onto the black base.
- Load the food: Place the s'more (or any test food) on a small piece of black paper or the black bottom of the oven. Close the lid gently so the plastic wrap stays sealed.
- Start the experiment: Position the oven on a flat surface where it receives direct sunlight. Use a thermometer placed on the food to record the temperature every 5 minutes.
- Observe and record: Note the time when the temperature first reaches 80 °C and when the food appears melted. Take a photo of the setup for documentation.
- Iterate if needed: If the temperature goal is not met, try one or more of the following adjustments:
- Increase the foil area or smooth out wrinkles.
- Re‑angle the flap to catch more direct sunlight.
- Add extra layers of crumpled newspaper for better insulation.
- Ensure the plastic wrap is taut and sealed to prevent heat loss.
The entire build takes about 20–30 minutes; the cooking phase is the observation period.
What to observe or measure
- Temperature: Record the internal temperature at 5‑minute intervals using a thermometer. Plot temperature vs. time to see how quickly the oven heats.
- Cooking outcome: Note whether the chocolate fully melts and whether the marshmallow softens or browns.
- Angle of the flap: Write down the angle you used (you can estimate with a protractor or by counting degrees on a printed diagram).
- Sunlight conditions: Record the time of day, cloud cover (clear, partly cloudy), and ambient temperature. These factors explain variations between trials.
The science explained
Solar ovens work by converting sunlight into heat through three linked processes:
- Reflection: The aluminum foil on the flap reflects incoming solar radiation onto the black interior. The reflective surface acts like a mirror, directing more photons to the absorber.
- Absorption: The black paper (or black duct tape) has a low reflectivity and a high absorptivity, meaning it absorbs most of the light that hits it and turns that light energy into thermal energy (heat).
- Greenhouse effect: The clear plastic wrap is transparent to short‑wave solar radiation but opaque to the longer‑wave infrared radiation that the heated black surface emits. This traps heat inside the box, raising the internal temperature.
Because the oven is insulated with crumpled newspaper, convective heat loss (air movement that carries heat away) is reduced, allowing the temperature to climb. The performance is limited by the size of the reflective area, the quality of the seal, and the intensity of the sun (measured in watts per square meter). On a clear summer day, solar irradiance can exceed 1000 W/m², which is enough to raise the oven’s interior above 80 °C within minutes, as demonstrated in the DOE lesson plan and the Science Buddies activity [1][2].
Troubleshooting
- Temperature stays low (<60 °C): Check that the foil is smooth and fully covering the flap. Wrinkles scatter light and reduce reflected intensity.
- Plastic wrap is sagging or tearing: Replace it with a new piece and ensure it is stretched tightly. Gaps let warm air escape.
- Food does not melt after 30 minutes: Verify that the flap angle is between 30° and 45°. Too shallow a angle reflects light past the box; too steep a angle reflects it back toward the sky.
- Box becomes too hot to handle: Use a folded piece of cardboard as a handle, or hold the oven by the uncoated edges of the lid. The cardboard itself stays relatively cool compared to the interior.
- Clouds reduce performance: Pause the test and resume when the sky clears, or note the reduced temperature as part of the data set.
Next steps
Once the basic oven meets the success criteria, you can turn the activity into a deeper engineering investigation:
- Compare different insulating materials (e.g., foam board vs. newspaper).
- Test alternative reflective surfaces such as Mylar sheets.
- Measure how the oven’s performance changes with latitude or season by recording solar angle.
- Design a portable “cook‑on‑the‑go” version that folds flat for transport.
These extensions encourage iterative design, data analysis, and the application of the same scientific principles to new challenges.
Sources & references
- U.S. Department of Energy, "Build a Pizza Box Solar Oven," https://www1.eere.energy.gov/education/pdfs/lesson298.pdf
- Science Buddies, "Build a Pizza Box Solar Oven," https://www.sciencebuddies.org/stem-activities/solar-oven
- HGTV, "How to Make a Solar Oven From a Cardboard Box," https://www.hgtv.com/decorating/diy/how-to-make-a-solar-oven
- Imperial College London, "Solar oven – activity," https://www.imperial.ac.uk/be-inspired/schools-outreach/secondary-schools/stem-in-action/energy-and-sustainability/solar-oven--activity/