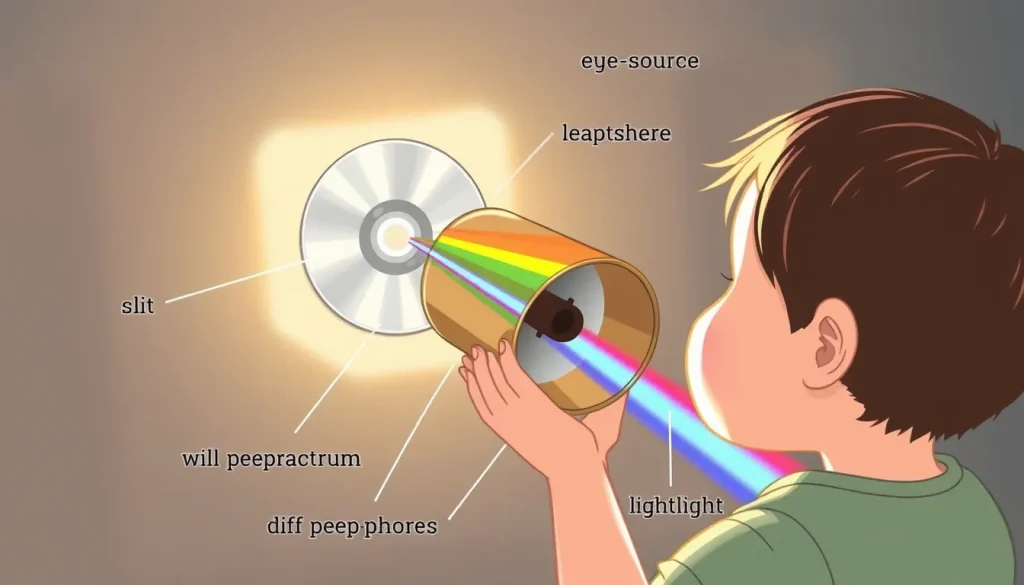
In this beginner‑level demonstration you will turn a short piece of cardboard tubing and an old compact disc (CD) into a working spectroscope. By looking through the tube at a light source, children can see the rainbow of colors that make up white light and begin to understand how scientists use spectra to study the world.
Orientation
A spectroscope separates light into its constituent colors (wavelengths) using diffraction. The closely spaced tracks on a CD act like a diffraction grating, bending different wavelengths by slightly different angles, so the colors fan out into a visible spectrum.
Before you begin
- Choose a well‑ventilated workspace with a flat surface.
- Adult supervision is required for cutting the cardboard tube and handling the razor knife.
- Never point the spectroscope directly at the sun; use reflected sunlight on a wall or indoor light sources.
Materials
- One empty cardboard tube at least 12 in (30 cm) long and 3–4 in (7.5–10 cm) diameter (e.g., a mailing‑tube or paper‑towel roll).
- One clean, unused CD (or DVD) – the shiny side will become the diffraction element.
- Two pieces of cardboard or the plastic end caps that came with the tube to cover the ends.
- Razor knife or X‑Acto blade.
- Clear tape (or masking tape).
- Ruler and marker.
All of these items are commonly found at home or in a classroom. The CD is the key optical component; a DVD works similarly but may produce a slightly different spacing of tracks.
Build the spectroscope – Steps
- Measure and mark a 1‑inch (2.5 cm) wide slot 2 inches (5 cm) from one end of the tube. The slot should be cut at a 45° angle so the opening is a narrow slit.
- Using the razor knife, carefully cut the slit. Keep the cut clean; a jagged slit scatters light and reduces spectral clarity.
- Cut a small rectangular “peephole” (about 0.5 in × 0.75 in) in one of the end‑cap pieces. This will be the eye window.
- Place the CD inside the tube so the shiny side faces the slit. Position the CD about 1 inch (2.5 cm) from the slit; you may need to tape it in place.
- Attach the end‑cap with the peephole to the opposite end of the tube using tape. Make sure the tube is light‑tight – any gaps let stray light in and wash out the spectrum.
- Optional: Cover the outside of the tube with black paper or paint to improve contrast.
What to observe
- Point the slit toward a light source (e.g., a fluorescent ceiling lamp, a desk lamp, or reflected sunlight on a wall).
- Look through the peephole. You should see a thin, rainbow‑shaped band of colors – the spectrum.
- Notice how different light sources produce slightly different spectra (e.g., fluorescent lights show bright green spikes, while sunlight shows a smooth continuous rainbow).
- Record your observations with a sketch or a short note: describe the intensity of each color band and any noticeable bright lines.
The science explained
When white light strikes the microscopic tracks on the CD surface, each track acts like a series of equally spaced lines. Light of wavelength λ is diffracted at an angle θ that satisfies the grating equation d sin θ = mλ, where d is the spacing between tracks and m is the diffraction order (usually 1 for a simple spectroscope). Because each wavelength satisfies the equation at a slightly different angle, the light spreads out into a continuous spectrum that we can see.

Scientists use spectroscopes to identify the composition of distant stars, to monitor pollutants, and to study the properties of lasers. Our simple CD spectroscope demonstrates the same principle on a scale you can build at home.
Troubleshooting
- No spectrum appears. Check that the slit is narrow and clean; a too‑wide slit lets too much light in and blurs the colors.
- Colors are very dim. Make sure the tube is sealed from stray light and that the CD is positioned correctly. Use a brighter light source or increase the distance between the light and the slit.
- Rainbow is smeared or overlapping. The CD may be tilted; ensure it lies flat inside the tube.
- Only a single bright line is visible. You may be looking at a higher diffraction order or the light source may be monochromatic (e.g., a laser pointer). Switch to a broadband source like a lamp.
Try another version
- Replace the CD with a piece of diffraction grating (often sold on hobby websites) for sharper lines.
- Use a longer tube (up to 18 in) to increase the separation between colors, making the spectrum easier to read.
- Add a removable black sleeve around the tube to block ambient light when moving the spectroscope.
- Record spectra from several sources (LED, incandescent bulb, candle) and compare the patterns on a worksheet.
Cleanup and disposal
Recycle the CD and cardboard tube when finished. Tape and any scrap cardboard can be placed in regular recycling. Keep the razor knife out of children’s reach after use.
Next steps
After mastering the basic spectroscope, children can explore quantitative ideas such as estimating the wavelength of a bright line using the known track spacing of a CD (≈1.6 µm). They can also investigate how filters (e.g., colored cellophane) change the observed spectrum, linking the activity to topics in optics and astronomy.
Related terms
- Diffraction
- The bending of light waves when they encounter a regular pattern of tiny openings or ridges, causing the light to spread into its component colors.
- Spectrum
- The range of colors (wavelengths) that make up white light, visible when the light is separated by diffraction or refraction.
- Wavelength
- The distance between successive peaks of a light wave; different wavelengths correspond to different colors.